Add Zigbee Green Power (ZGP) devices
Zigbee Green Power (ZGP) is a technology that enables ultra-low power devices like switches and sensors to operate within Zigbee networks. ZGP devices are designed to be energy-efficient by only transmitting messages during normal operation.
Add ZGP switches
It is recommended to first add lights to all the groups within a wireless network before adding ZGP switches. Unassigned lights nearby create more BLE traffic, which can cause localizing ZGP devices to take longer. Remember, at least one light must be added to a group or zone before any ZGP devices can be added.
| ZGP devices must be localized and installed within direct Zigbee range of the groups they will control. |
-
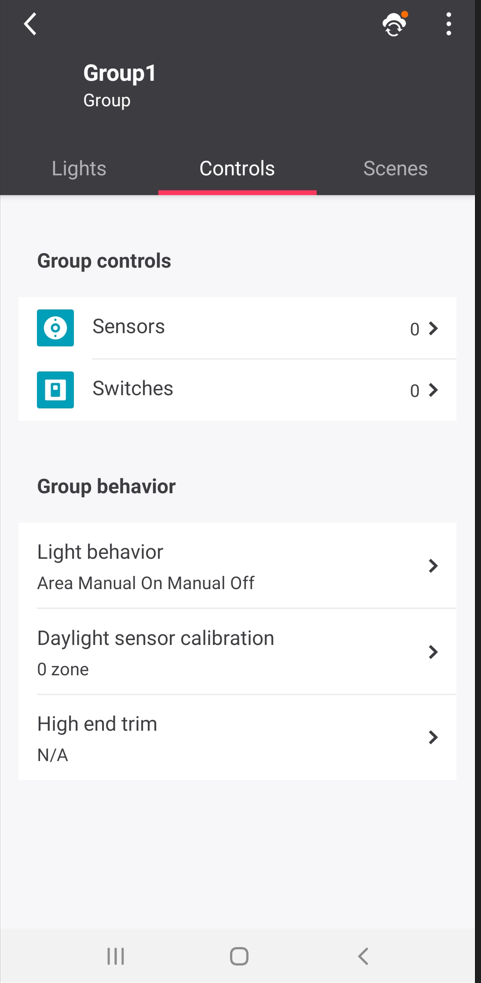
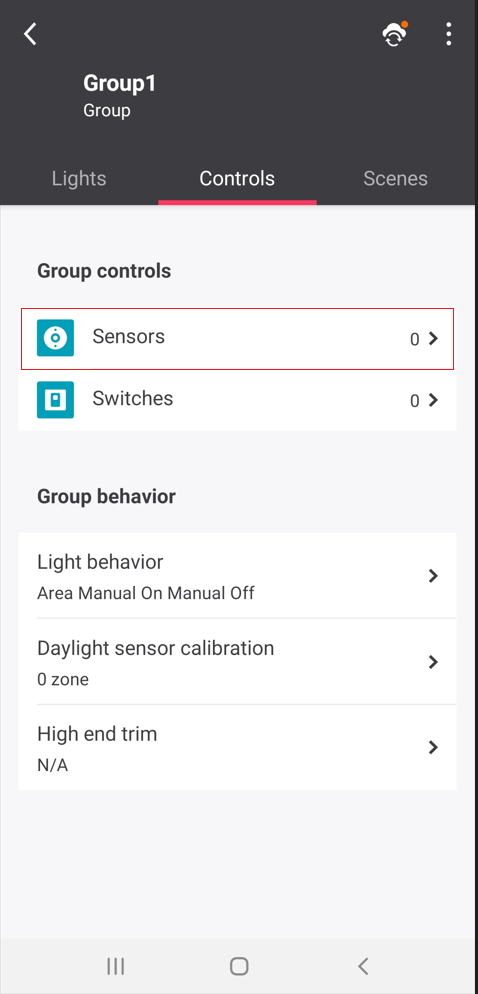
Navigate to the appropriate Group, then tap Controls.

-
Tap Switches.
-
On the Switches screen, tap Add switch.
-
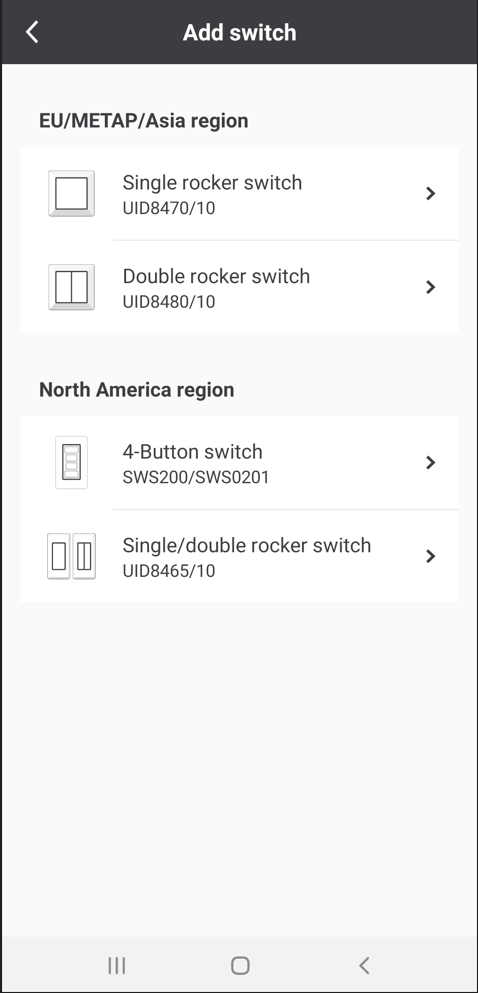
Tap the appropriate switch from the list based on the model of switch installed on-site.
-
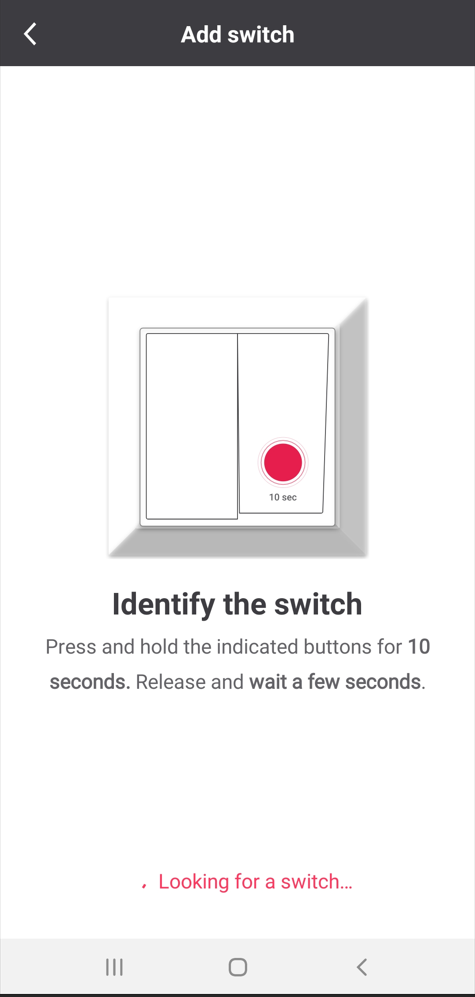
Follow the add switch process prompted by the app. Be aware that switches have different workflows depending on if they are single or double rocker switches, or if they kinetic or battery-powered. Read each screen and follow the instructions carefully, as all steps must be completed properly to successfully add the switch.
-
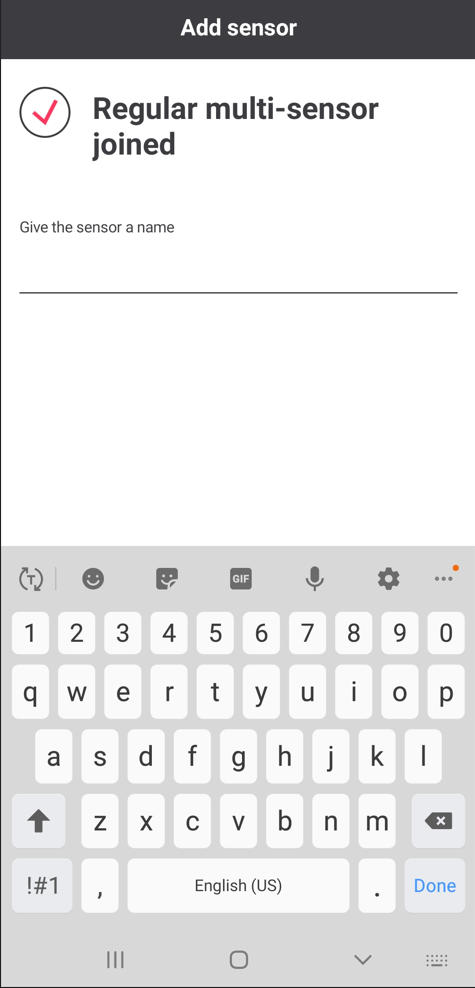
Once the switch is joined, type a name for the switch, then tap Done. If you are adding a convertible single/dual rocker switch, a screen will appear for you to select the rocker configuration you desire.
-
For any 4-button or dual rocker switch joined, the Configure switch now? screen will appear. If you tap Later, then you will need to edit the switch configuration later if you wish to add scenes to your switch buttons. Single rocker switches cannot be configured further.
-
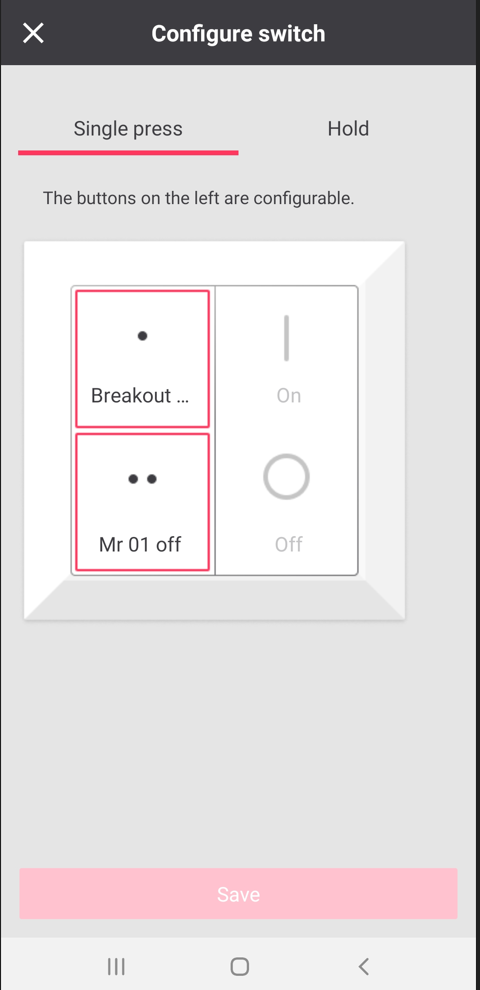
For any 4-button or dual rocker switch joined, if you tap Configure on the Configure switch now? screen, the Configure switch screen appears. Tap on each highlighted button to select the desired scene to assign to each switch button.
-
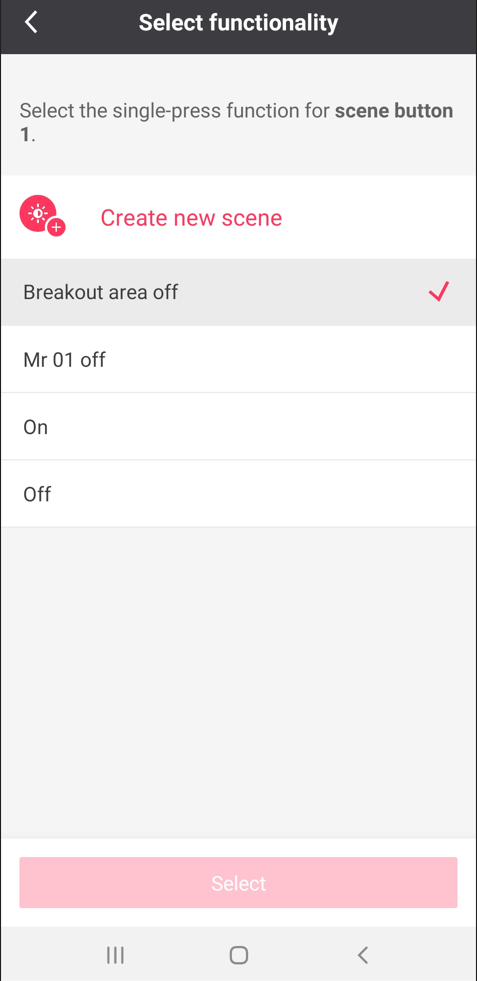
When either button is tapped to add a scene, the Select functionality screen appears. If scenes have already been created, you can select them from the list. Alternatively, tap Create new scene to configure a new scene to assign to the switch button (Refer to Create Scenes for more details).
-
Tap Save to record the changes.
-
If you do not assign scenes to your switch now, or you wish to change the configuration later, just navigate back to the Controls, then Switches screen in the group.
-
For the switch you wish to configure, tap the 3-dot-ellipsis beside the switch, then tap Change configuration. This will open the Configure switch screen where you can assign, change or remove scenes from switch buttons.
Add ZGP sensors
It is recommended to first add lights to all the groups within a wireless network before adding ZGP sensors. Unassigned lights nearby create more BLE traffic, which can cause localizing ZGP devices to take longer. Remember, at least one light must be added to a group or zone before any ZGP devices can be added.
| ZGP devices must be localized and installed within direct Zigbee range of the groups they will control. |
There are two types of battery-powered ZGP sensors:
-
ZGP Occupancy sensor:
-
These sensors are used for motion detection only and can detect both major and minor movements.
-
Occupancy sensors do not have the capability for daylight-dependent regulation (DDR).
-
-
ZGP Multi-sensor:
-
A multi-sensor has motion detection like the occupancy sensor, but also includes light level detection for daylight-dependent regulation (DDR), which means it can adjust the lighting level based on the amount of ambient daylight present.
-
Multi-sensors cannot be combined in groups with luminaires with built-in sensors, as the built-in sensors ignore both occupancy and DDR messages from multi-sensors. They can only be combined with luminaires and devices without built-in sensors, such as luminaires with built-in transceivers or wireless drivers, as well as Smart T-LEDs and switch relays.
-
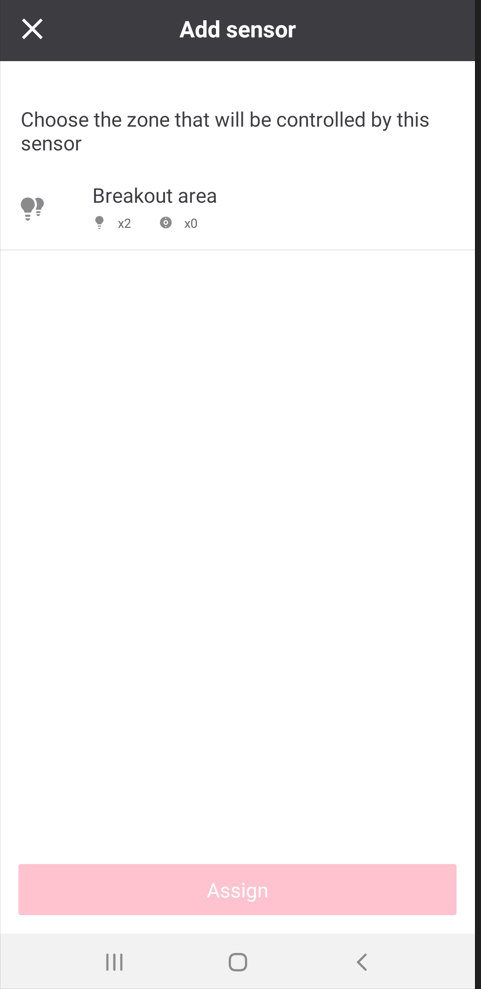
Multi-sensors must be added to zones (sub-groups), as this is where DDR functionality is accomplished. Only one multi-sensor is allowed per zone, to prevent multiple multi-sensors from sending conflicting DDR messages to the same lights within a zone.
-
Add occupancy sensors
-
Navigate to the appropriate Group, then tap Controls.
-
Tap Sensors.
-
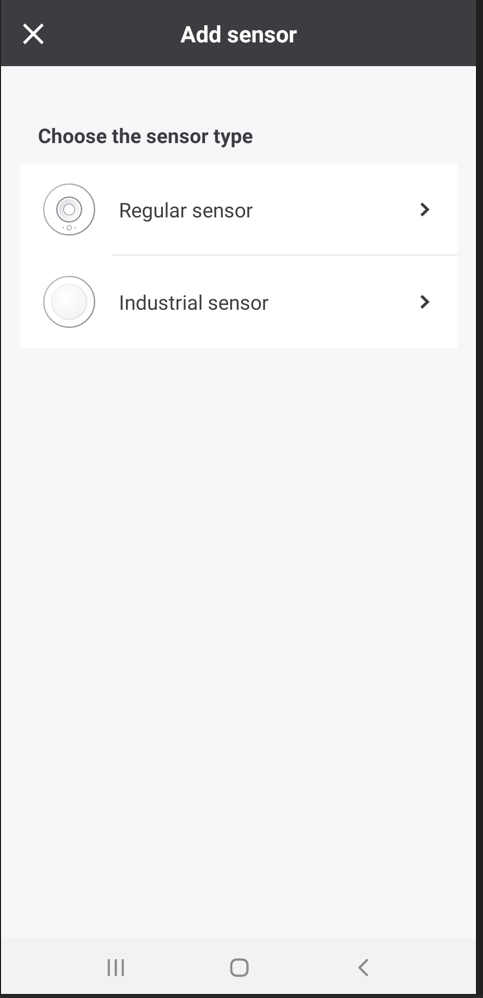
On the Sensors screen, tap Add sensor.
-
Tap the appropriate sensor from the list based on the model of sensor installed on-site.
-
Follow the add sensor process prompted by the app. Be aware that sensors have different workflows depending on if they regular or industrial sensors. Read each screen and follow the instructions carefully, as all steps must be completed properly to successfully add the sensor.
-
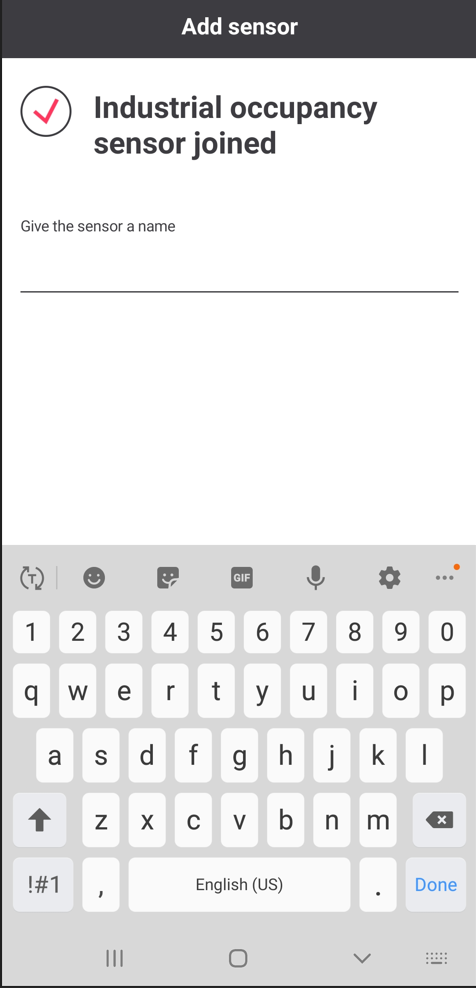
Note that the green LED indicator on the sensor will blink slowly when the commissioning button is pressed (or when the battery strip is first pulled out), then will blink twice quickly when the sensor successfully joins. If the LED indicator blinks red, reset the sensor by pressing and holding the reset button for approximately 8 seconds (you should see both the red and green indicator LEDs on the sensor blink twice), then retry the process.
-
Once the sensor is joined, type a name for the sensor, then tap Done.
-
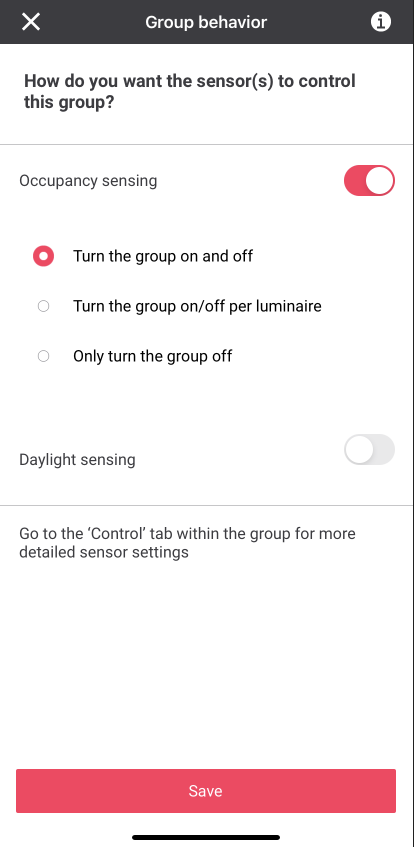
The Group Behavior screen appears. On this screen, you can set the group behavior using the options presented. However, this is optional and you may wish to set the group behavior later when you can also modify the behavior parameters. If you wish to set the group behavior later (recommended), or you had already set the group’s behavior previously, then tap on the X symbol to close this screen, or else your parameter settings will be overwritten by default values.
Add multi-sensor
A multi-sensor enables daylight regulation for lights in a zone without built-in sensors. A maximum of one multi-sensor can be added per zone in the group. Other occupancy-only sensors can be added at the group level if needed..
-
Navigate to the appropriate Group, then tap Controls.
-
Tap Sensors.
-
On the Sensors screen, tap Add sensor.
-
Tap the appropriate sensor from the list based on the model of sensor installed on-site.
-
Follow the add sensor process prompted by the app. Be aware that sensors have different workflows depending on if they regular or industrial sensors. Read each screen and follow the instructions carefully, as all steps must be completed properly to successfully add the sensor.
-
Note that the green LED indicator on the sensor will blink slowly when the commissioning button is pressed (or when the battery strip is first pulled out), then will blink twice quickly when the sensor successfully joins. If the LED indicator blinks red, reset the sensor by pressing and holding the reset button for approximately 8 seconds (you should see both the red and green indicator LEDs on the sensor blink twice), then retry the process.
-
Once the sensor is joined, type a name for the sensor, then tap Done.
-
The Group Behavior screen appears. On this screen, you can set the group behavior using the options presented. However, this is optional and you may wish to set the group behavior later when you can also modify the behavior parameters. If you wish to set the group behavior later (recommended), or you had already set the group’s behavior previously, then tap on the X symbol to close this screen, or else your parameter settings will be overwritten by default values.
-
Select the appropriate zone from the list, then tap Assign.