Commission the project
Concepts used for commissioning
Before starting with commissioning, it is important to understand a number of key concepts (terminology) used in the app. The app itself also provides online help on these concepts.
Light Networks
A light network is used to cluster a set of lights that use a unique Zigbee network to communicate. It serves as a placeholder or proxy so that a gateway can be added to enable connected features. Proper choice of light networks allows seamless addition of gateways at a later stage. A typical project consists of one or more light networks. Lights added to different light networks can not be grouped or controlled together.
For small projects, typically only one light network is needed. There are a number of situations where multiple light networks are required:
-
projects having more than 200 lights or 50 ZGP controls (system limitation to ensure quality of service),
-
projects with lights at multiple floors (RF signal quality),
-
projects in buildings with reinforced walls (RF signal quality),
-
projects with a distance larger then 10m (30ft) between lights (RF signal strength).
Multiple light networks are needed because of system limitations or RF signal quality.
Groups and zones
To be able to control sets of lights in a room or space, they need to be added to a group. Lights in a group act together on control via sensors, switches and the app. The app enables to set up a group with the desired control behavior.
PRF/PRA supports the following concepts:
-
a group is a set of standalone lights and/or zones
-
a zone is a set of lights within the group
The group level is used to switch lights on or off. Features like occupancy control (using sensors) or manual switching using a switch or the app work on group level. All standalone lights and the lights in the zones of the group will act on such control. Zones support two important functionalities:
-
lights in a zone can be set as a unit when defining scenes
-
daylight regulation works on lights in zones only

Create project and light networks
A project consists of one or more light networks. The following commissioning flow is used:

PRA supports both lights from generation 1 (without Bluetooth) that always require a gateway and lights of generation 2 that can be directly added to the system using Bluetooth. For lights with IR (InfraRed) capability, the adding process can be accelerated using an IR remote as pointing device for selecting and adding a light to a group. PRF only supports lights of generation 2 and can be commissioned without a gateway. Gateway(s) can be added anytime to enable the features of a connected system (Advanced).
Creating a project
After log on into the app the first time, an empty project screen is displayed. Press the + in the bottom-right corner of the screen to create the first project. Creating the project, also assigns the installer role authorization for this project.
After selecting the project, it is locked. This restricts access to the project to the phone the app is running on and the PRF/PRA account used on that phone. After commissioning, a new account has to be created to hand over the project to the customer (owner role).
| An installer can create and manage multiple projects with one account. |
Creating a light network and gateways
The app asks you to create the first light network.

As an example, the screenshot above shows what to expect after creating a light network called Floor 1. It also displays an important message Not synced with the cloud. Next to unlocking the project (which automatically triggers a sync), it is important that a backup is created of the most crucial credentials of the project. This allows for
-
using another phone with the same account when for some reason the current phone can’t be used anymore
-
using another account (and another phone) to access the project
This mechanism prevents that anyone that downloaded the app on a phone can start connecting to the light system and it also allows for a secure handover to other people that need access to the project.
|
If a job of installing and commissioning a project takes multiple days, it is good practice to unlock the project before leaving the premises. It will prevent that work can’t continue if for some reason another phone needs to be used the next day. |
The next step is to decide whether you want to commission with or without gateways.
-
For Bluetooth-enabled lights, you can choose whether or not to commission with gateways.
-
When lights of generation 1 are installed, you have to use gateways for commissioning.
-
With a combination of lights installed, you also have to use gateways for commissioning.
|
If you have Bluetooth-enabled lights (generation 2), it is recommended to start the commissioning process without gateways. Bluetooth communication between the phone and the lights is much faster than Zigbee communication via the gateway. When the objective is to commission an PRA project, start commissioning without gateways and configure all functionality. When this is completed, add the gateways and optionally create schedules as desired. |
If multiple lighting networks are created to commission a project, you have to either select the without gateway(s) option for all light networks or with gateway(s). When adding gateways, add a gateway for each light network in project. It is not recommended to have projects with mixed connection status for a prolonged period of time.
Commissioning groups
In order to set up the desired light behavior for the project, all lights that are installed have to be grouped, linked with the appropriate control devices and the desired control behavior settings have to be configured using the PRF/PRA app.
Add scenes
To add scenes, use the following steps:
-
Select a project and go to group view
-
Tap on settings icon from the scenes section
-
Create a new scene and define the desired parameters
-
Tap Save
Configure tunable white
| Only certain lights support tunable white. For the full list of lights that support tunable white, contact your representative or support. |
The tunable white feature can be configured while adding or editing scenes or by configuring light behavior of a group.
To change the color temperature of a group:
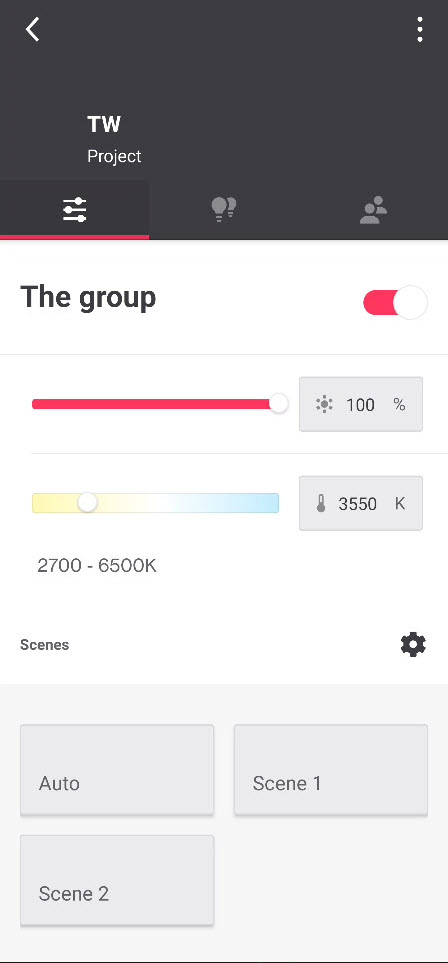
-
Go to the group view
-
Select the color temperature by using the slider
To change the color temperature of a scene:
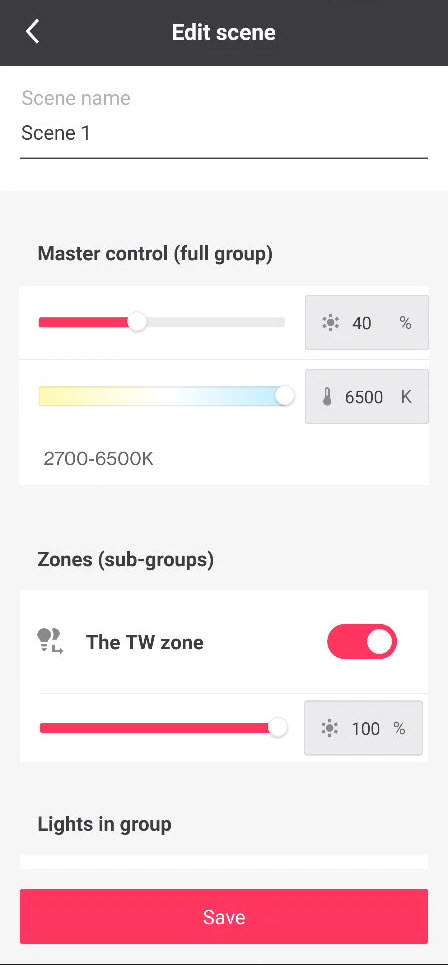
-
Create or edit a scene
-
Select the color temperature of the group by using the color temperature slider
To change the color temperature light behavior template:
-
Select or add a new light behavior
-
Select the color temperature by using the slider
Scan and add lights
PRA supports both lights from generation 1 (without Bluetooth) that always require a gateway and lights of generation 2 that can be directly added to the system using Bluetooth. For lights with IR (InfraRed) capability, the adding process can be accelerated using an IR remote as pointing device for selecting and adding a light to a group. PRF only supports lights of generation 2 and can be commissioned without a gateway. Gateway(s) can be added anytime to enable the features of a connected system (Advanced).
First, we describe how lights are discovered/scanned for the different types of luminaires and how this fits the overall process steps for setting up a group of lights. Then the other steps are explained in more detail.
Scan and add lights (Bluetooth)
For each of the light networks in the project, the steps in the figure below have to be executed for each group that is going to be created:

Scan and add lights (Zigbee only)
Lights of generation 1 need to connect to a gateway before they can be grouped. This is the flow that has been used in the original version of PRF/PRA and that is still supported by the current app for PRA.
For each gateway added in the project, after discovery of the lights for that gateway, the steps in the figure below need to be executed for each group that is going to be created.

|
Only projects with gateways can be used in combination with lights of generation 1. Lights of generation 1 can sent Bluetooth beacons for sorting purposes (for instance after an update) but they lack the security credentials to add them via Bluetooth to the system. |
The discovery process terminates if it can’t find new lights in a period of 5 minutes. Each time a new light is found, the period is extended for 5 minutes. When all lights are discovered, the process can be stopped with the app.
|
Lights of generation 1 send out messages for a limited amount of time. When the app starts a discovery process, the gateway for which the process has been started adds lights that announce itself to its network. For new installs or in situations were the lights have been powered for more than 24 hours, a power cycle of those lights is required to make sure that each of the lights is sending these messages. If possible, power cycle those lights that you want to be discovered is beneficial for fast discovery. |
Add a ZGP switch to a group
-
Tap Controls
-
Tap Add switch.
-
Tap the appropriate switch type. The app shows all switches that are supported by the system (see below). The system guides you through all the steps you need to execute to add it to the system. Note that the steps are different for different switches.

-
UID8450 (EU/RoW), UID8451 (US) or UID8470 (EU/RoW)
-
UID8470: kinetic switch that requires an explicit confirmation step for commissioning. You have to remove the rocker to configure the switch. Please make sure that the orientation of the rocker is correct after commissioning (see also installing switches).
-
-
UID8480 (EU/RoW): 4 button kinetic switch. You don’t have to remove the rocker to commission this switch.
-
SWS200 (US): 4 button battery powered switch.
Commissioning UID8470
The plastic cover of the switch has to be removed to select the appropriate button for the first step of commissioning. You need to pay attention during install but also when executing this step, that the orientation of the wireless module but also of the cover is correct.
You can remove both the plastic cover (rocker) and the wireless module at the same time. Make sure that when you turn it to its backside, the text is not upside down. Looking at the front of the switch, look for the 0 and 1 symbols between the buttons, the 0 should be at the top and the 1 (I) at the bottom (see picture below).
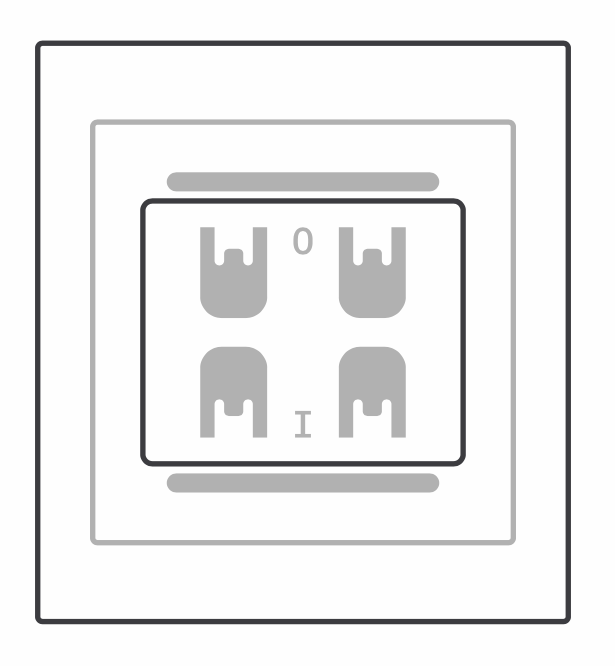
When you click back the rocker, look at the back and make sure that the side with the two plastic knobs is at the right hand side when clicked back to the wireless module.
Commissioning UID8480
For this switch, you can leave the plastic covers (rockers) assembled. Do check the orientation of the switch (up versus down) when pressing the buttons.
When the switch is added to the group, the app offers an option to configure it: the two left buttons of this switch can be used to bind a scene (if already defined). Adding or changing scenes can be done at any time, if no scenes have been defined yet simply skip this option. The default behavior of the buttons at the left is the same as the buttons at the right.
Commissioning SWS200
The app guides you through the steps for a new switch (remove battery protection). However, if a SWS200 switch has been used in another project, it needs to be reset before it can be added again to a group.
Reset it by pressing the reset button for 2 seconds by using a tiny metal pin (paperclip) to press the button inside the hole above the 0 button (see figure below). After reset, the switch can be commissioned again.

The switch can be used to turn the lights on or off, or dim the lights up or down. Using the switch is a manual override of the light level set by automated control. The 4 button switches can also be used to configure with two scenes that can then be set using the switch.
Add a ZGP sensor
ZGP sensors are used for control features for lights without sensing capability:
-
Sensors enable automatic switching of the lights based on occupancy.
-
Multi-sensors enable daylight regulation that adapts the dim level of the lights to the ingress of light to maintain a more equal light level.
Examples are CoreLine luminaires and MasterConnect lamps. For lights with sensing capability, an additional ZGP sensor can be used to implement use cases where occupancy detection is needed outside the area covered by the lights with sensing capability.
The process for adding sensors is similar for an occupancy sensor and a multi-sensor. However, an occupancy sensor has to be added to a group and controls occupancy on group level, whereas a multi-sensor has to be added to a zone in a group. A multi-sensor drives occupancy control on group level but daylight regulation for the lights in the zone it is added to.
| Only one multi-sensor can be added to a zone. For lights without sensing capability, occupancy coverage can be achieved by adding additional occupancy sensors to the group. |
Add an occupancy sensor to a group
-
Tap Controls at the group level in the app.
-
Tap Add sensor.
-
Select the sensor type:
-
Regular sensor for office applications
-
Industrial sensor for applications up to 8m height. This sensor is IP65 rated.
-
-
The app guides you through the commission steps for the type of sensor selected.
| When giving the sensor a name, write down its name on the back of the sensor. This facilitates maintenance and support of sensors when needed. |
After adding the sensor to the network, as a convenience, the app asks you to configure the Switch on/off behavior (see screen below). Pending on the selection, the corresponding behavior is saved. You can also ignore this step by clicking the X in the top-left corner.
Add a multi sensor to a zone in a group
In order to enable daylight regulation for a number of lights in a group, these lights need to be in zone and one multi-sensor needs to be assigned to each zone in that group.
-
Tap Controls at the group level in the app.
-
Tap Add sensor.
-
Select the sensor type:
-
Regular sensor for office applications
-
Industrial sensor for applications up to 8m height. This sensor is IP65 rated.
-
-
The app guides you through the commission steps for the type of sensor selected.
| Make sure that you assign a multi sensor in this case. |
High end trim
With high end trim, you limit the maximum light level of the lights in a group. The light output of this setting is used by the system as the 100% level for all other features and therefore, if used, it needs to be set before defining light levels as part of other light control features. It is typically used to cap an excess of installed power in a group. Over the years its value can be adjusted to compensate for degradation of light output of devices over time.
|
If high end trim is used, it is important to set its value before any of the other lighting features. When set, its corresponding light output level is the maximum of any of the other features. As the system uses an exponential curve to associate level with light output, it is highly recommended to not set the value of high end trim too low as that reduces the operating window for other features. A value between 80% and 100% is therefore recommended if high end trim is used. |
Set the maximum output level using high end trim
-
(Optional) Select the applicable light network
-
(Optional) Select the group
-
Tap Control: setting up control is a logical action after adding all the lights for a specific space/room and if used, start with high end trim.
-
Tap High end trim
-
Use the slider to set the light output to the desired level.
| When the settings are deployed, high end trim is applied to all lights in the group. |
| Use a lux meter to validate whether the light level on the work surface is as desired. |
Using high end trim to set maximum output power
When the high end trim slider is moved, the visual perception of the resulting power output of the lights is linear.
As an example, moving from 95% to 90% is perceived as a similar reduction in light level as moving from 75 to 70%. To achieve this, the lumen output of lights changes exponentially and thus also the power changes exponentially when moving the slider.
If you want to use high end trim to reduce a specific amount of power, for instance 50%, you can use the graph below that depicts the relation between slider setting and power. You need to set the level in the app to 90% to achieve the 50% of this example.
| The app doesn’t show the reduction in power. |

Switch on/off behavior
Occupancy sensing allows for automatic switch on or off of groups of lights pending on the detection of occupancy. Daylight sensing allows for regulating the lights to a desired set point pending on the ingress of daylight. To enable how a group of lights acts on occupancy and whether lights in zones need to be regulated for ingress of daylight, the system allows to configure a number of so called switch on/off behaviors. After selecting a behavior, optionally parameters can be adapted to further tailor the behavior of the system to the requirements.
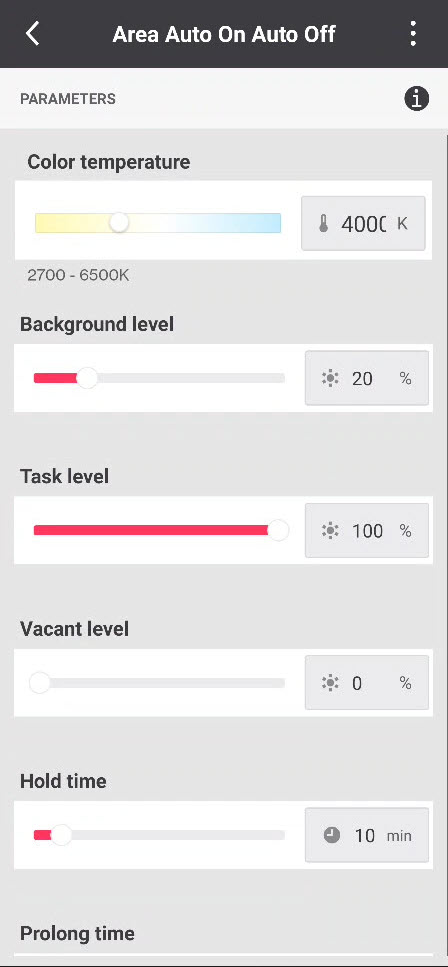
When using occupancy based control, the lights follow a well-defined pattern after the occupancy state of the group changes (see figure below). The light levels and the length of the time period can be defined when setting a specific behavior. Also, pending on the luminaire type (with or without sensor) and the behavior selected, there is some variation how individual lights in groups and zones act to occupancy.

When occupancy is detected by one of the sensors in the group, the lights in the group go from vacant level to task level (T1 → T2).[1] When no occupancy is detected anymore by one of the sensors, the hold time period starts (T3). Upon expiration of the hold time, the lights are dimmed down to the background level (T4 → T5) and remains at this level for the duration of the prolong time. Upon expiration of the prolong time, the lights dim down to vacant level (T6 → T7).
| Behavior | Controls needed |
|---|---|
Area Manual On Manual Off |
ZGP switch |
Area Manual On Auto Off |
ZGP occupancy sensor, luminaire sensor, ZGP switch |
Area Auto On Auto Off |
ZGP occupancy sensor, luminaire sensor |
Area Manual On Auto Off with DDR |
ZGP multi-sensor, luminaire sensor, ZGP switch |
Area Auto On Auto Off with DDR |
ZGP multi-sensor, luminaire sensor |
Light Auto On Auto Off |
luminaire sensor |
Light Auto On Auto Off with DDR |
luminaire sensor |
-
ZGP switches can be added to any group for local override
-
Light behaviors are specifically targeted for luminaires with sensor
Deploy settings
In PRF/PRA , all changes made to a group are saved in the app and/or the backend (Advanced). It is decoupled from actually transferring the changes to the lights in the group, which can be time consuming. Therefore, it is most efficient to execute all steps to set up a group before transferring them. The app warns that a group is not in sync with the settings saved using a warning.
Tap Deploy settings
It transfers the settings saved to the lights in the group after which it starts executing its control behavior.
Groups with a pending deployment action are marked with an orange indicator. When Control is selected for such a group, a message reminds you to deploy the settings to the lights. As an example, in the picture below changes have been made to the groups G2 and G3 that require deployment. Click each of the groups, to deploy the settings to the lights.

Handling deployment failures
Deployment of settings implies wireless transmission of data to those lights and this may fail. The app shows this using an orange indicator[2].
If the settings deployment process fails, a Retry option is available. Before retrying to deploy check if the Wireless Gateway is online and lights are powered.
The figure below shows an example how the app reports a partial failure of deployment and what to do next.

Calibrate the lights for daylight regulation
In order to control the intensity level of the lights in the zone pending on the ingress of daylight, the lights have to be calibrated.
-
Go to the group with the zone(s) to be calibrated.
-
Tap Controls.
-
Tap Daylight sensor calibration
-
Select the zone and adjust the default level to the required set point
-
Start the calibration
The app shows a message that the calibration takes 6 minutes. To proceed to the next group, tap < in the top-left corner of the screen (see figure below). The calibration continues in the background and end after a maximum of 6 minutes.

|
Make sure to have as little influence as possible from other light sources (outside the group in particular ingress light). It is recommended to close the blinds and/or to perform calibration after sunset. |
|
Use a lux meter in case you want to validate the actual light level on the work surface when setting the control point for calibration. |
For groups with multiple zones or standalone lights with sensors, the current behavior of the system is that you only need to calibrate one of the zones in the group.
All lights within its group are calibrated to the set point selected for that zone. This has the following implications:
-
for groups with multiple zones, all lights across the zones regulate to the same set point used for calibration rather than the set point of each zone
-
for groups with lights outside a zone, these lights regulate pending on ingress of daylight. These lights can not be set at a fixed dim level which is the case for setups with discrete sensors and lights without sensor.
A side-effect of above is that there is no waiting time involved in calibrating each zone sequentially. You can immediately proceed to commission the next group.
|
Start the light engine when calibration has finished by turning the group off and on. It is recommended to go through all groups with daylight regulation after the install to execute this action, for instance by walking into the space or turning the lights on with the app. |
Project handover and user management
Project locks in PRF/PRA - Foundation
PRF locks and unlocks projects per phone and user identity. This lock prevents concurrent access to the system via Bluetooth: it implies that a lock has to be removed before another user can access the project. Security credentials are the means to prevent that anyone with an PRF/PRA app can access an arbitrary PRF/PRA project. The figure below shows a project overview with a project that has been locked.

The project lock mechanism is combined with a backup function called cloud sync that is used to store security credentials to the cloud. This enables the transfer of those credentials to another phone and user (with proper access rights to the project in the app).
It is highly recommended to unlock a project when a commissioning job is interrupted and before logging out of the app. Here are a number of examples why this is important, each of the cases are not standard but also not that uncommon:
-
Installer forgets the phone and wants to continue the next day with another phone.
-
Installer gets sick and a co-worker continues the installation process with another phone.
-
Problems with the phone used and want to switch to another one.
Unlocking a project can be done, by right-clicking on the 3 dots at the right-hand side of a locked project. Tap Unlock.
Project handover from installer to owner (customer) in PRF/PRA - Foundation
After completion of the commissioning process, the installer has to provide access to the customer (Owner role). The following steps need to be executed by the installer:
-
Invites an Owner via his preferred email address (that he wants to use to access the system)
-
Unlocks the project
-
(Optional) Logs out
The customer has to execute the following steps:
-
Accepts the invitation email sent by the system and creates account credentials.
-
Logs into the app with the newly created credentials.
-
(Optional) Invites another person as Owner (for backup reasons)
Project handover from installer to owner (customer) in PRA
After completion of the commissioning process, the installer has to provide access to the customer (Owner role). The following steps need to be executed by the installer:
-
Invites an Owner via his preferred email address (that he wants to use to access the system)
The customer has to execute the following steps:
-
Accepts the invitation email sent by the system and creates account credentials.
-
Logs into the app with the newly created credentials.
-
(Optional) Invites another person as Owner (for backup reasons)
-
(Optional) Deletes installer accounts to deny future access
-
(Optional) Invites users with restricted group access for personal control.
Roles in PRF/PRA
It is important to understand that there are some rules and constraints using roles:
-
Self-registration creates an account with Service Provider role
-
Create project adds Installer role to a Service Provider role
-
-
All other roles (Installer, Owner and User) are by invitation!
-
Owners can delete Installers
-
Owners can only access one project
-
Users can only access one project
-
Installers and service providers ae linked to an organizational entity: the concept of a freelance installer that can be added and removed to any project is not possible today