Configure group behavior
There are three components to group behavior: high end trim, light behavior and daylight sensor calibration. Daylight sensor calibration should only be done after the other group behaviors and scenes have been deployed to the group, so that will be covered in a following section.
High end trim
High end trim is an optional setting that limits the maximum light/power output of a group below its normal maximum. If a high end trim is desired, it is advisable to set it before the light behavior and scene levels are configured because it will proportionally reduce these levels, potentially making them too dim.
-
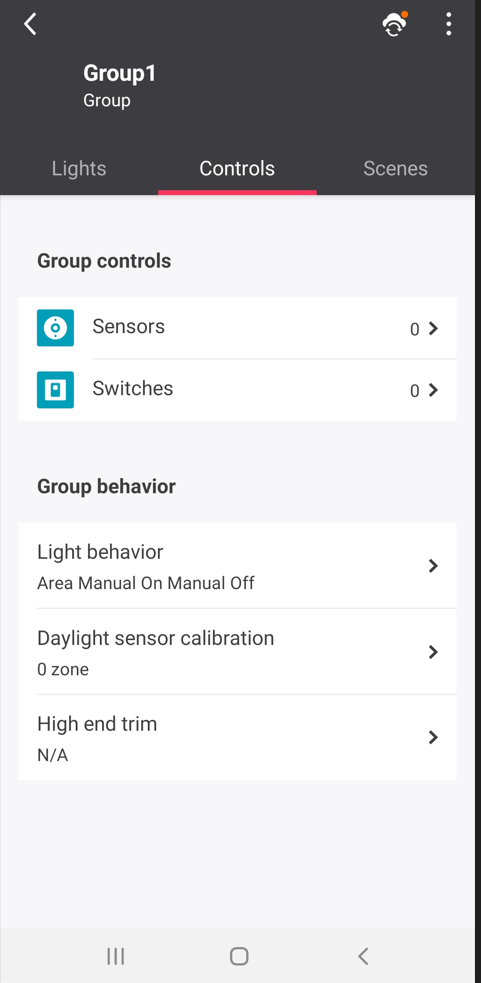
Navigate to the appropriate Group, then tap Controls.
-
Under the Group behavior section, tap High end trim.
-
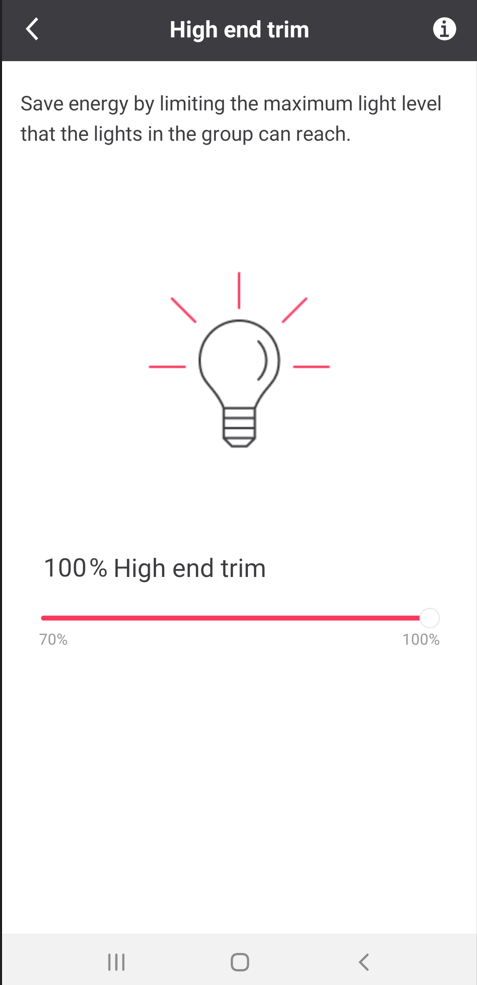
Move the slider to achieve the desired reduction in maximum light level or power reduction. The reduction in light level and power is linear to the eye but is exponential in its actual reduction (Refer to Highend Trim for more details).
-
Tap the < chevron to navigate back to the group Controls screen.
Light behavior - Configure the template
Light behavior templates enable different group responses to occupancy, vacancy and light level DDR. After selecting a light behavior template, parameters can be adjusted to tailor the light behavior according to the needs.
-
Navigate to the appropriate Group, then tap Controls.

-
Under the Group behavior section, tap Light behavior.
-
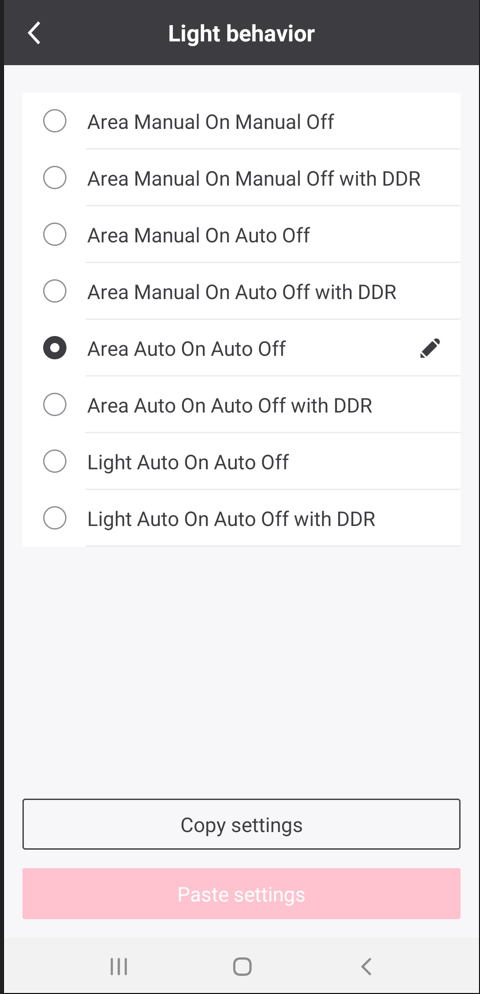
Select the appropriate light behavior template based on your desired group response to occupancy, vacancy and DDR (Refer to Behavior Templates for more details).
-
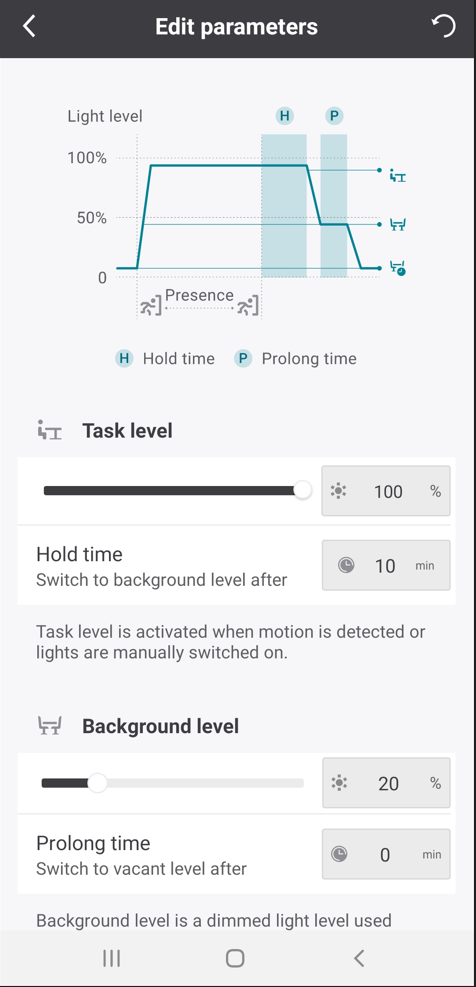
Tap the Pen icon beside the selected template to configure the corresponding light level and time delay parameters (Refer to Behavior Templates for more details).
-
Tap the < chevron to navigate back to the group Controls screen.
Light behavior - Daylight regulation minimum light level
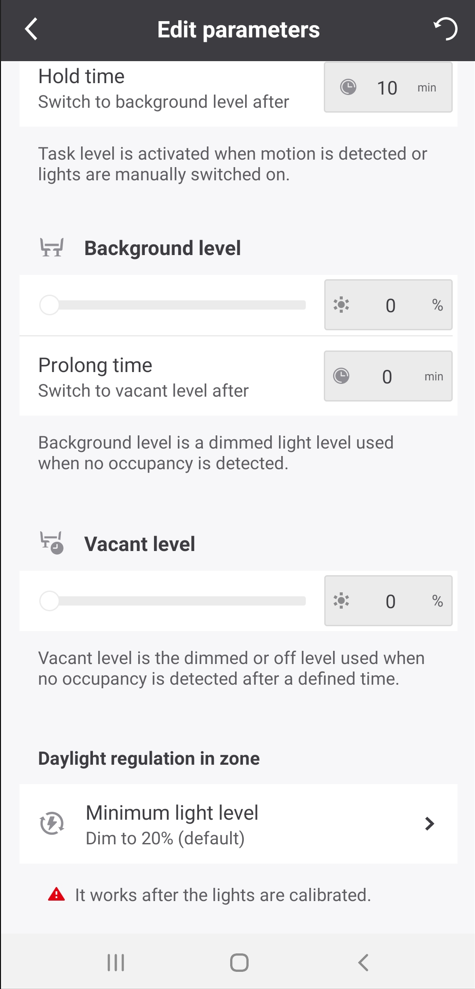
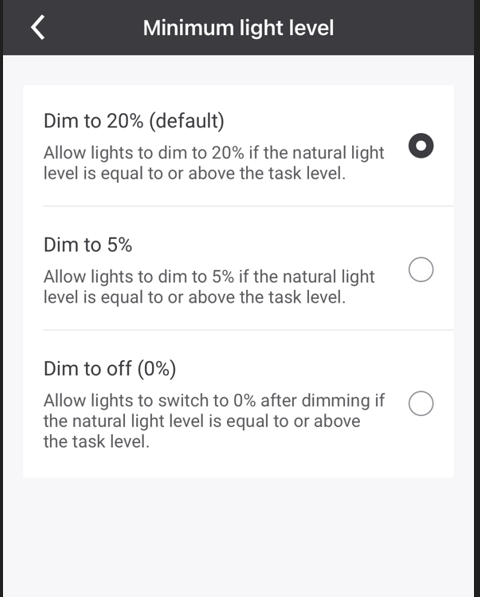
For “…with DDR” light behavior templates that include daylight regulation, you can adjust the minimum dimming level the lights in calibrated DDR zones will regulate to by selecting between Dim to 20% (default), Dim to 5% and Dim to off (0%).
| You can only see the options of Dim to 5% and Dim to off (0%) when devices have a firmware version equal or higher than 7.2.x. |
-
Navigate to the appropriate Group, then tap Controls.

-
Under the Group behavior section, tap Light behavior.
-
Tap the Pen icon beside the selected “…with DDR” template.
-
Scroll down and under the Daylight regulation in zone section, then tap Minimum light level.
-
Select your minimum light level option.
-
Tap the < chevron to navigate back to the group Controls screen.
Light behavior - Outdoor parking daylight override
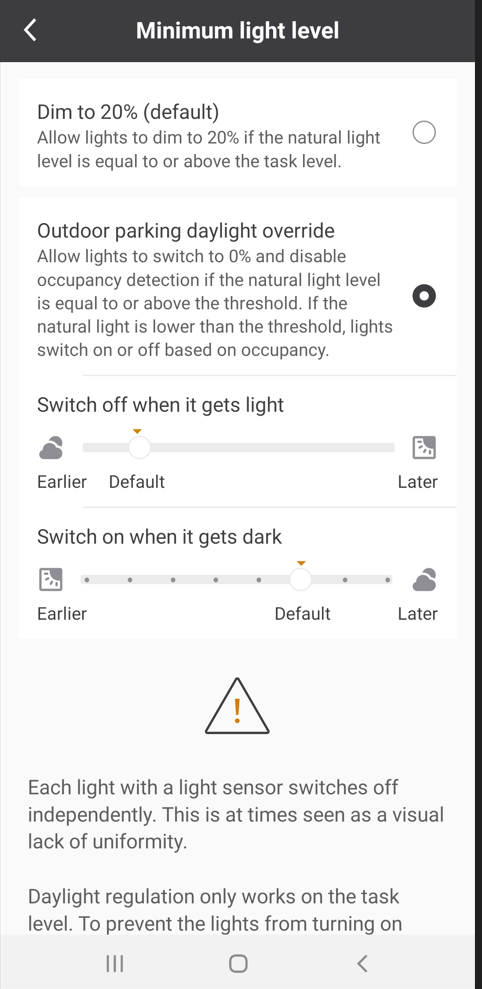
For “…with DDR” light behavior templates that include daylight regulation, you can enable the Outdoor parking daylight override function when you are using outdoor parking sensors in a zone. This enables sensors to override their respective luminaire behavior to turn off and stay off when the ambient light level is above a factory calibrated preset, preventing outdoor parking lights from “day burning”. No daylight sensor calibration is required when this option is selected.
| To enable Outdoor parking daylight override, you must be using Outdoor parking sensors in a zone. |
-
Navigate to the appropriate Group, then tap Controls.

-
Under the Group behavior section, tap Light behavior.
-
Tap the Pen icon beside the selected “…with DDR” template.
-
Scroll down and under the Daylight regulation in zone section, then tap Minimum light level.
-
Tap Outdoor parking daylight override.
-
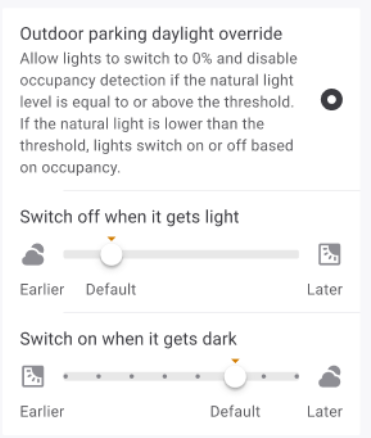
The Switch off when it gets light and the Switch on when it gets dark sensitivity settings appear.
-
Switch off when it gets light: This parameter sets the light level threshold at which the sensor will switch off the lights in the morning. Always use the default value as a starting point. If the lights are switching off too late or too early, slightly adjust the slider to the opposite direction. For example, if lights are switching off too early in the morning, move the slider to the "Later" side and check again.
-
Switch on when it gets dark: This parameter sets the light level threshold at which the sensor will switch on the lights in the evening, or possibly during dark, stormy days. Always use the default value as a starting point. If the lights are switching on too late or too early, slightly adjust the slider to the opposite direction. For example, if lights are switching on too late in the evening, move the slider to the "Earlier" side and check again.
-
-
Tap the < chevron to navigate back to the group Controls screen.
Sensor info - occupancy sensing
Lights with built-in sensors and standalone mains powered sensors can have their occupancy detection individually enabled or disabled once they are added to a group. If a sensor in a room is too close to a door or HVAC vent for example, its occupancy sensing can be disabled to avoid nuisance motion triggering from passing motion or HVAC systems.
Occupancy sensing settings are not supported by ZGP battery-powered sensors, as they cannot have their occupancy sensing disabled if added to a group.
| All built-in or mains powered sensors in a group must have the minimum firmware level to support this function. If the minimum firmware version is not met by all sensors in a group, the occupancy sensing per sensor option will be disabled. The firmware of the sensors can be updated by adding gateways and running a project update (Refer to Project Updates for more details), or by updating the sensor(s) using the BLE OTA update function. |
-
Navigate to the appropriate Group. The Lights screen is shown by default.
-
To adjust occupancy sensing settings for lights with built-in sensors from the Lights screen, tap the Info icon beside the light to load the Light info screen. Scroll down to the Occupancy sensing section, then tap to toggle the light’s occupancy sensing on or off accordingly.
Tip: Tap the light icons to blink each light if you are not sure which light you need to adjust.
-
To adjust occupancy sensing settings for mains powered sensors, or as an alternative way to adjust occupancy settings for built-in sensors, tap Controls, then tap Sensors in the Group controls section. Sensors will be listed by the types that are installed in the group under three sections: Battery powered (occupancy sensing settings not supported), Mains powered, Integrated sensor luminaires.
-
For mains powered sensors, tap the chevron beside the desired sensor to load the Sensor info screen. Scroll down to the Occupancy sensing section, then tap to toggle the sensor’s occupancy sensing on or off accordingly.
Tip:Tap the sensor icons to blink each sensor’s LED indicator if you are not sure which sensor you need to adjust.
-
For built-in sensors, tap the Info icon beside the desired sensor to load the Sensor info screen. Scroll down to the Occupancy sensing section, then tap to toggle the sensor’s occupancy sensing on or off accordingly.
Tip: tap the light icons to blink each built-in sensor if you are not sure which sensor you need to adjust.
-
Sensor info - occupancy sensing sensitivity
Lights with built-in sensors and standalone mains powered sensors can have their occupancy detection sensitivity adjusted individually once they are added to a group. If a sensor is in an office where the occupant sits still for prolonged periods for example, it may be desirable to increase the sensitivity to reduce nuisance timeouts. Occupancy sensing sensitivity settings are not supported by ZGP battery-powered sensors (they cannot have their occupancy sensing disabled if added to a group).
| Only SC200 built-in sensors and mains powered sensors (MPS) support sensitivity adjustment. Older SNS210 IA built-in sensor models do not support this function. All sensors in a group must have the minimum firmware level to support this function. If the minimum firmware version is not met by all sensors in a group, the occupancy sensing sensitivity per sensor option will be disabled. The firmware of the sensors can be updated by adding gateways and running a project update (Refer to Project Updates for more details), or by updating the sensor(s) using the BLE OTA update function. |
-
Navigate to the appropriate Group. The Lights screen is shown by default.
-
To adjust occupancy sensing sensitivity settings for lights with SC200 built-in sensors from the Lights screen, tap the Info icon beside the light to load the Light info screen. Scroll down to the Occupancy sensing section, then tap the Sensitivity option and choose either High, Medium (default) or Low.
Tip: Tap the light icons to blink each light if you are not sure which light you need to adjust.
-
To adjust occupancy sensing settings for mains powered sensors, or as an alternative way to adjust occupancy settings for SC200 built-in sensors, tap Controls, then tap Sensors in the Group controls section. Sensors will be listed by the types that are installed in the group under three sections: Battery powered (occupancy sensing settings not supported), Mains powered, Integrated sensor luminaires.
-
For mains powered sensors, tap the chevron beside the desired sensor to load the Sensor info screen. Scroll down to the Occupancy sensing section, then tap the Sensitivity option and choose between High, Medium (default) and Low.
Tip: Tap the sensor icons to blink each sensor’s LED indicator if you are not sure which sensor you need to adjust.
-
For built-in sensors, tap the Info icon beside the desired sensor to load the Sensor info screen. Scroll down to the Occupancy sensing section, then tap the Sensitivity option and choose between High, Medium (default) or Low.
Tip: Tap the light icons to blink each built-in sensor if you are not sure which sensor you need to adjust.
Changing the sensitivity of a battery-powered ZGP sensor is not possible via the app. You can change the sensitivity of a ZGP sensor by rotating the sensitivity knob that can be found at the back of the sensor.
-
Sensor info - daylight sensing
Lights with built-in sensors and standalone mains powered sensors can have their daylight sensing detection for Daylight Dependent Regulation (DDR) individually enabled or disabled once they are added to a zone in a group. Sensors not added to zones will have their daylight sensing option fixed as disabled. Daylight sensing settings are not supported by ZGP battery-powered multi-sensors. Do not use ZGP multi-sensors in the same zone with built-in and/or mains powered sensors.
-
When daylight sensing is enabled in a sensor, it will DDR based on its own light level detection, independently from other sensors in the zone.
-
When daylight sensing is disabled in a sensor, the sensor will follow the Zone master for DDR, which is another sensor in the same zone that is selected to be the daylight reference for:
-
All other built-in or mains powered sensors in the zone with their daylight sensing option disabled
-
Any lights in the zone without a built-in sensor.
-
| All built-in or mains powered sensors in a group must have the minimum firmware level to support this function. If the minimum firmware version is not met by all sensors in a group, the daylight sensing per sensor option will be disabled. The firmware of the sensors can be updated by adding gateways and running a project update (Refer to Project Updates for more details), or by updating the sensor(s) using the BLE OTA update function. |
-
Navigate to the appropriate Group. The Lights screen is shown by default.
-
Tap the appropriate Zone where you wish to configure daylight sensing settings.
-
To adjust daylight sensing settings for lights with built-in sensors from the Zone screen, tap the Info icon beside the light to load the Light info screen. Scroll down to the Daylight sensing section, then tap to toggle the light’s daylight sensing on or off accordingly.
Tip: Tap the light icons to blink each light if you are not sure which light you need to adjust.
-
To adjust daylight sensing settings for mains powered sensors, or as an alternative way to adjust daylight settings for built-in sensors, tap Controls, then tap Sensors in the Group controls section. Sensors will be listed by the types that are installed in the group under three sections: Battery powered (daylight sensing settings not supported), Mains powered, Integrated sensor luminaires.
-
For mains powered sensors, tap the chevron beside the desired sensor to load the Sensor info screen. Scroll down to the Daylight sensing section, then tap to toggle the light’s daylight sensing on or off accordingly.
Tip: Tap the sensor icons to blink each sensor’s LED indicator if you are not sure which sensor you need to adjust.
-
For built-in sensors, tap the Info icon beside the desired sensor to load the Sensor info screen. Scroll down to the Daylight sensing section, then tap to toggle the light’s daylight sensing on or off accordingly.
Tip: Tap the light icons to blink each built-in sensor if you are not sure which sensor you need to adjust.
-
Sensor info - daylight sensing zone master
Lights with built-in sensors and standalone mains powered sensors can be chosen as a zone master once they are added to a zone in a group and their daylight sensing option is enabled. Zone master settings are not supported by ZGP battery-powered multi-sensors. Do not use ZGP multi-sensors in the same zone with built-in and/or mains powered sensors.
-
When daylight sensing is enabled in a sensor, it will DDR based on its own light level detection, independently from other sensors in the zone.
-
When a sensor is additionally enabled as the Zone master for DDR, that sensor becomes the daylight reference for:
-
All other built-in or mains powered sensors in the zone with their daylight sensing option disabled
-
Any lights in the zone without a built-in sensor
-
-
There can only be one zone master sensor per zone. Enabling a sensor as a Zone master will automatically disable any other sensor that was previously set as the zone master.
-
When there are lights in the zone without a built-in sensor, a zone master must be enabled for these lights to respond to DDR.
| All built-in or mains powered sensors in a group must have the minimum firmware level to support this function. If the minimum firmware version is not met by all sensors in a group, the daylight sensing zone master per sensor option will be disabled. The firmware of sensors can be updated by adding gateways and running a project update (Refer to Project Updates for more details), or by updating the sensor(s) using the BLE OTA update function. |
-
Navigate to the appropriate Group. The Lights screen is shown by default.
-
Tap the appropriate Zone where you wish to configure daylight sensing zone master settings.
-
To adjust daylight sensing zone master settings for lights with built-in sensors from the Zone screen, tap the Info icon beside the light to load the Light info screen. Scroll down to the Daylight sensing section, then tap to toggle the light’s zone master setting on or off accordingly.
Tip: Tap the light icons to blink each light if you are not sure which light you need to adjust.
-
To adjust daylight sensing zone master settings for mains powered sensors, or as an alternative way to adjust zone master settings for built-in sensors, tap Controls, then tap Sensors in the Group controls section. Sensors will be listed by the types that are installed in the group under three sections: Battery powered (daylight sensing settings not supported), Mains powered, Integrated sensor luminaires.
-
For mains powered sensors, tap the chevron beside the desired sensor to load the Sensor info screen. Scroll down to the Daylight sensing section, then tap to toggle the light’s zone master setting on or off accordingly.
Tip: Tap the sensor icons to blink each sensor’s LED indicator if you are not sure which sensor you need to adjust.
-
For built-in sensors, tap the Info icon beside the desired sensor to load the Sensor info screen. Scroll down to the Daylight sensing section, then tap to toggle the light’s zone master setting on or off accordingly.
Tip: tap the light icons to blink each built-in sensor if you are not sure which sensor you need to adjust.
-